
Install a Fishing Rod Holder
Click on photos for larger image
Here are a few tips on installing a fishing rod holder on your kayak. Rod holders that face the rear of the kayak work well when using heavier trolling gear for big game fish, but for fishing with lighter gear and fish where you need to respond quickly to a strike, a rod holder in the front of the kayak works best. You can easily see when a fish strikes and quickly grab the rod out of the holder instead of having to turn around and grab the rod. The most popular rod holders are made by Scotty, there are others that make similar systems.
For kayak fishing, you want a rod holder mount that has a low profile and is waterproof so water does not get into the hull through the rod holder mount, so a flush mount with a sealed base is the best choice.
For kayak fishing, you want a rod holder mount that has a low profile and is waterproof so water does not get into the hull through the rod holder mount, so a flush mount with a sealed base is the best choice.
Determine Rod Mount Placement
The first step is to determine where the rod holder is going to be mounted on the kayak. The rod holder should be within easy reach so you can grab the rod quickly when you get a bite but needs to be out of the way of paddling(or pedaling) the kayak.

You can install a rod holder just about anywhere in front of the kayak fisherman where you have room. If you mount the rod holder on the side of the kayak, if you are right-handed, you should mount the rod holder on the right side of the kayak, if you are a southpaw, mount the holder on the left side.
If you don't have room for a rod mount, like on a pedal kayak, you need to install rails on the gunwales and use a RAM mount rod holder.
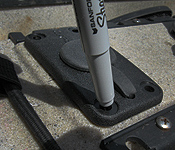
Mark Rod Holder Mount Hole
A good sized hole will be needed to install the flush mount for the rod holder.
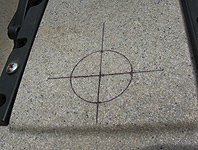
Carefully determine where this hole is going to be. Mark the hole with a Sharpie. The rod mount base must fit snugly in the hole so make sure the measurements are accurate.
A good sized hole will be needed to install the flush mount for the rod holder.

Carefully determine where this hole is going to be. Mark the hole with a Sharpie. The rod mount base must fit snugly in the hole so make sure the measurements are accurate.
Check Mount Placement
You are going to be cutting and drilling holes in you kayak. Before you do that, check and double check the placement of your rod mount base.
Once you start cutting and drilling, there is no going back, so make sure your placement is correct.
You are going to be cutting and drilling holes in you kayak. Before you do that, check and double check the placement of your rod mount base.
Once you start cutting and drilling, there is no going back, so make sure your placement is correct.
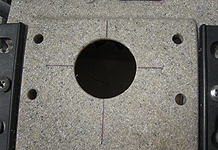
Cut Rod Mount Base Hole
After double checking the rod mount layout, it's time to cut a hole for the mount base. Put a box inside the hull under where the hole will be to catch plastic chips and cut down on cleanup time.
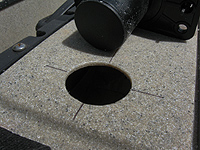
Drill a starter hole and cut the hole in the kayak using a sabre saw with a fine tooth blade. You can use a hand saw or knife, but the saber saw or saw bit that you use with a hand held drill is the easiest way to go. When you're done cutting, clean up the hole with a piece of fine grit sandpaper to ensure a smooth fit.
Mark Bolt Holes
Place the rod mount base in the hole cut in the kayak.
Position the base the way you want it to go and mark the bolt mounting holes with a Sharpie.
Place the rod mount base in the hole cut in the kayak.

Position the base the way you want it to go and mark the bolt mounting holes with a Sharpie.
Drill Mount Bolt Holes
When the mount bolt holes have been marked, drill holes for the bolts.
Make sure the holes are in the right place before you start drilling. Drill holes that are only slightly larger than the bolts being used to attach the mount base.
When the mount bolt holes have been marked, drill holes for the bolts.

Make sure the holes are in the right place before you start drilling. Drill holes that are only slightly larger than the bolts being used to attach the mount base.
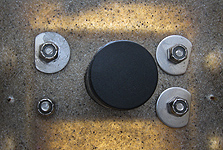
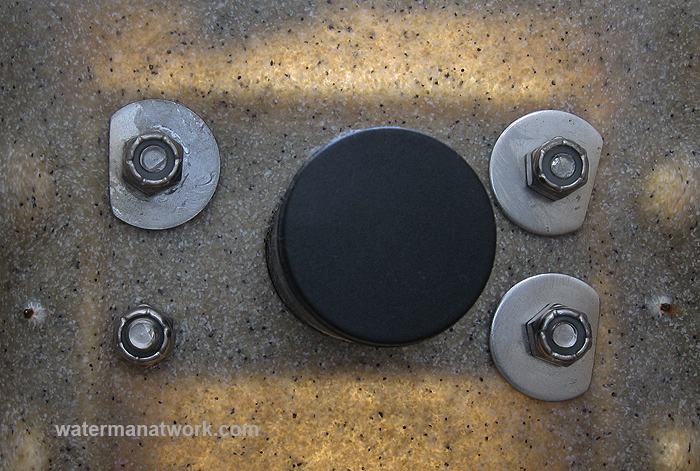
Check Mounting Hardware
Check the mounting hardware to make sure everything is going to fit. Always use stainless steel hardware on the kayak.
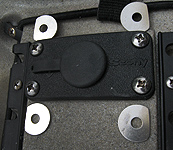
Use round head machine screws and nylon insert lock nuts. Use some kind of backing hardware to lessen the stress of the rod mount on your kayak. In this case, we are using stainless steel fender washers. Because of the kayak design, a part of the washer had to be removed to fit. Make sure all the hardware fits before the final installation.
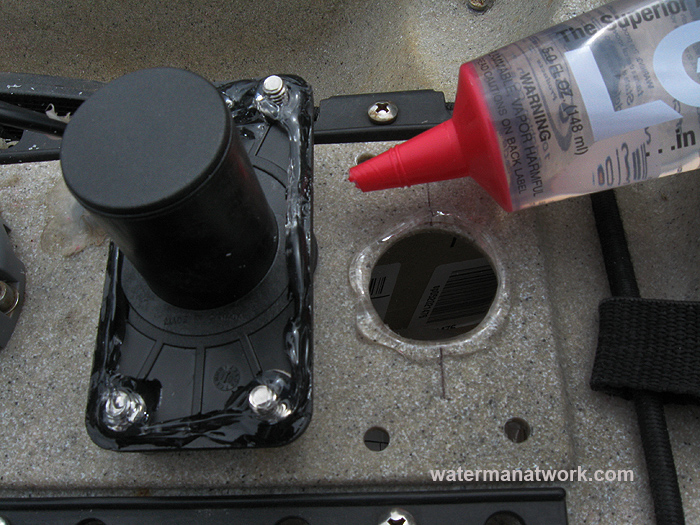
Apply Sealant to Mount Base and Bolts
Apply sealant to the rod mount base and mounting bolts. Use plenty of sealant to make sure that the rod mount installation is completely waterproof.
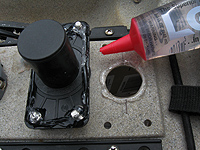
There are a few types of sealant that will do the job, usually we use Lexell. It takes a few days to fully cure, but it has very good adhesive qualities and is very durable and long lasting.
Apply sealant to the rod mount base and mounting bolts. Use plenty of sealant to make sure that the rod mount installation is completely waterproof.
There are a few types of sealant that will do the job, usually we use Lexell. It takes a few days to fully cure, but it has very good adhesive qualities and is very durable and long lasting.
Tighten Mounting Hardware
After applying the sealant to the mount and mounting hardware, place the mount base in the kayak, install the backing hardware and lock nuts and tighten down the hardware.
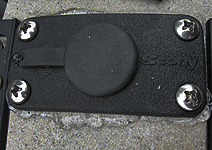
Excess sealant should be squeezed out from all around the rod mount base. Make sure the hardware is tight, but don't crank down on it to the point where you crack the mount base or the kayak material.
Clean Up Excess Sealant
Before the sealant starts curing, use paper towels and clean up the excess sealant. A clean installation makes your kayak look better.
Before the sealant starts curing, use paper towels and clean up the excess sealant. A clean installation makes your kayak look better.
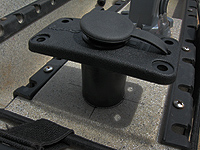
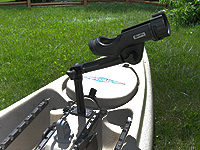
Ready To Fish
For this kayak, we used a 6 1/2" height extender to raise the rod holder higher off the deck and a 6 1/2" rod holder extender to move the rod holder outboard towards the side of the kayak.
This makes the rod easy to reach when it's in the holder and keeps the fishing line up and out of the way when paddling the kayak. This setup works perfect when trolling for salmon, trout or walleye.
For this kayak, we used a 6 1/2" height extender to raise the rod holder higher off the deck and a 6 1/2" rod holder extender to move the rod holder outboard towards the side of the kayak.

This makes the rod easy to reach when it's in the holder and keeps the fishing line up and out of the way when paddling the kayak. This setup works perfect when trolling for salmon, trout or walleye.
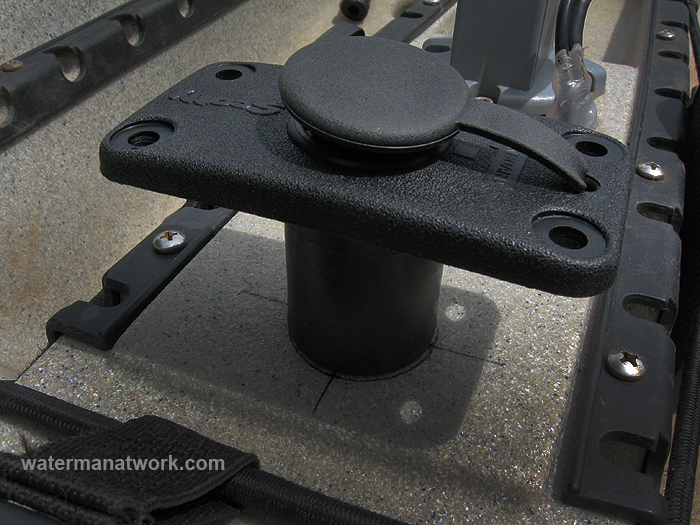
Fine Tuning
The Scotty rod holder holds the rod very securely, in fact too securely. When large fish, like salmon, hit a trolled lure, it was difficult to get the fishing rod out of the holder with a fish on. We used a hacksaw to trim the rod holder to make it easier to get the rod out.
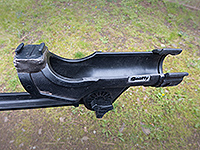
The rod holder locking ring still works when needed. We also attached a camera mount to the rod holder with JB Weld.
You can also use the mount to hold a fishfinder, GPS, mobile phone or camera.

Back to the Kayak Rigging Page
Back to the Kayak Fishing Page
watermanatwork Home Page
Waterman At Work Blog
Contact Us
Back to the Kayak Fishing Page
watermanatwork Home Page
Waterman At Work Blog
Contact Us
All material on this website is the property of the owner and may not be used without permission.
© watermanatwork.com